All Activity
- Earlier
-
سلام وقت به خیر به دنبال شخصی میگردم که بتونه نرم افزار SquareLine Studio برام کرک کنه . لینک دانلود نمیزارم ، سرچ کنید سایت سازندش پیدا میکنید
-
 mmAref joined the community
 -
moorgan joined the community
-
0xSt0rm joined the community
-
MUKHTAR joined the community
-
Uyer joined the community
-
 Chi3f joined the community
 -
 Mr.mooo changed their profile photo
 -
Mr.mooo joined the community
-
.thumb.png.d83024de73e7add7c34fcdcc24af20f0.png) به نام خدا JWT مخفف Json Web Token استانداردی بهینه و امن برای احراز هویت کاربر هنگام درخواست به سرور است. با این استاندارد سرور در هر درخواست کاربر بررسی میکند که درخواست ارسال شده از سمت کاربری با دسترسی مجاز هست یا نه دو روش پرکاربرد اعتبارسنجی سمت سرور وجود دارد: روش اول احراز هویت بر پایه کوکی ها می باشد و در آن به ازای هر درخواست، یک کوکی جهت اعتبارسنجی کاربر به سرور ارسال میشود (و برعکس). روش دوم احراز هویت بر پایه توکن ها است که بر مبنای ارسال یک توکن امضا شده به سرور، به ازای هر درخواست است. در روش دوم با استفاده از جیسون وب توکن زمانی که کاربری وارد سیستم میشود، سرور برای او یک توکن JWT صادر میکند که پس از آن در درخواستهای بعدی کاربر آن را در بخش header درخواست خود میگذارد و سرور با بررسی امضای دیجیتال آن از صحت و اصیل بودن توکن اطمینان حاصل کرده و براساس اطلاعات توکن کاربر را احراز هویت میکند. بنابر این روش مزیت هایی نسب به روش بر پایه کوکی پیدا میکند: در هنگام استفاده از کوکی فقط از دامنه و آدرسی مشخص میتوان به کوکی دسترسی داشت اما در روش توکن امضا شده فرقی ندارد که درخواست به چه سرور و مقصدی باشد فقط کافی است تا سرور مقصد کلید خصوصی امضای توکن را داشته باشد در حین کار با توکنها، نیازی به ذخیره اطلاعات سمت سرور نیست و چون توکن حاوی تمام اطلاعات مرتبط با کاربر بوده دیگر نیاز به درخواست سرور به بانک داده برای شناسایی و شناخت کاربر نیست و محل ذخیرهی آن در سمت کاربر میباشد و بهینه تر است نسبت به احراز هویت از طریق کوکی. ساختار JWT ونحوه عملکرد: به طور کلی هر توکن JWT شامل سه بخش: header.payload.signature است و هر بخش با الگوریتم Base64 اینکد میشود. بخش Header: معمولا دوبخش دارد که نوع توکن و الگوریتم مورد استفاده برای رمزنگاری را در آن مشخص میشود بخش Payload: این بخش شامل اطلاعاتی درباره کاربر هست مانند: صادر کننده توکن ،تاریخ انقضا ،عنوان ، مخاطب ،ادعای هویت و … بخش signature: امنیت توکن و دستکاری نشدن آن بر عهده امضای دیجتیال است. برای این که با تغییر و دستکاری اطلاعات دو قسمت قبلن توان ادعای دسترسی را جعل کرد و توکن تقلبی از سمتی غیر از سرور ساخت ابتدا بخش اول (هدر) با بخش دوم (پیلود) جمع شده و بعد با کلید خصوصی که فقط در سرور موجوده رمز میشه. بدین ترتیب اگر کسی اطلاعات توکن را دستکاری کند سرور با مشاهده عدم تطابق داده های فعلی با داده های بدست آمده از رمزگشایی امضای دیجیتال متوجه میشود و درخواست را رد میکند. نکاتی امنیتی : انتقال توکن باید حتماً توسط پروتکل امن HTTPS انجام شود تا از حملات مرد میانی و سرقت توکن جلوگیری شود. برای توکن ها زمان انقضای کوتاه تعریف شود تا در صورت سرقت، مدت زمان سوءاستفاده کم باشد. حتماً در رمزنگاری از الگوریتمهای معتبر و قوی مانند RS256 یا HS256 برای امضای توکن استفاده کنید تا از جعل و تغییر آن جلوگیری شود. و در نهایت اگر payload توکن دارای اطلاعات مهمی است میتوانید آن را هم رمزنگاری کنید. پیوست:
به نام خدا JWT مخفف Json Web Token استانداردی بهینه و امن برای احراز هویت کاربر هنگام درخواست به سرور است. با این استاندارد سرور در هر درخواست کاربر بررسی میکند که درخواست ارسال شده از سمت کاربری با دسترسی مجاز هست یا نه دو روش پرکاربرد اعتبارسنجی سمت سرور وجود دارد: روش اول احراز هویت بر پایه کوکی ها می باشد و در آن به ازای هر درخواست، یک کوکی جهت اعتبارسنجی کاربر به سرور ارسال میشود (و برعکس). روش دوم احراز هویت بر پایه توکن ها است که بر مبنای ارسال یک توکن امضا شده به سرور، به ازای هر درخواست است. در روش دوم با استفاده از جیسون وب توکن زمانی که کاربری وارد سیستم میشود، سرور برای او یک توکن JWT صادر میکند که پس از آن در درخواستهای بعدی کاربر آن را در بخش header درخواست خود میگذارد و سرور با بررسی امضای دیجیتال آن از صحت و اصیل بودن توکن اطمینان حاصل کرده و براساس اطلاعات توکن کاربر را احراز هویت میکند. بنابر این روش مزیت هایی نسب به روش بر پایه کوکی پیدا میکند: در هنگام استفاده از کوکی فقط از دامنه و آدرسی مشخص میتوان به کوکی دسترسی داشت اما در روش توکن امضا شده فرقی ندارد که درخواست به چه سرور و مقصدی باشد فقط کافی است تا سرور مقصد کلید خصوصی امضای توکن را داشته باشد در حین کار با توکنها، نیازی به ذخیره اطلاعات سمت سرور نیست و چون توکن حاوی تمام اطلاعات مرتبط با کاربر بوده دیگر نیاز به درخواست سرور به بانک داده برای شناسایی و شناخت کاربر نیست و محل ذخیرهی آن در سمت کاربر میباشد و بهینه تر است نسبت به احراز هویت از طریق کوکی. ساختار JWT ونحوه عملکرد: به طور کلی هر توکن JWT شامل سه بخش: header.payload.signature است و هر بخش با الگوریتم Base64 اینکد میشود. بخش Header: معمولا دوبخش دارد که نوع توکن و الگوریتم مورد استفاده برای رمزنگاری را در آن مشخص میشود بخش Payload: این بخش شامل اطلاعاتی درباره کاربر هست مانند: صادر کننده توکن ،تاریخ انقضا ،عنوان ، مخاطب ،ادعای هویت و … بخش signature: امنیت توکن و دستکاری نشدن آن بر عهده امضای دیجتیال است. برای این که با تغییر و دستکاری اطلاعات دو قسمت قبلن توان ادعای دسترسی را جعل کرد و توکن تقلبی از سمتی غیر از سرور ساخت ابتدا بخش اول (هدر) با بخش دوم (پیلود) جمع شده و بعد با کلید خصوصی که فقط در سرور موجوده رمز میشه. بدین ترتیب اگر کسی اطلاعات توکن را دستکاری کند سرور با مشاهده عدم تطابق داده های فعلی با داده های بدست آمده از رمزگشایی امضای دیجیتال متوجه میشود و درخواست را رد میکند. نکاتی امنیتی : انتقال توکن باید حتماً توسط پروتکل امن HTTPS انجام شود تا از حملات مرد میانی و سرقت توکن جلوگیری شود. برای توکن ها زمان انقضای کوتاه تعریف شود تا در صورت سرقت، مدت زمان سوءاستفاده کم باشد. حتماً در رمزنگاری از الگوریتمهای معتبر و قوی مانند RS256 یا HS256 برای امضای توکن استفاده کنید تا از جعل و تغییر آن جلوگیری شود. و در نهایت اگر payload توکن دارای اطلاعات مهمی است میتوانید آن را هم رمزنگاری کنید. پیوست:
-
mr.py changed their profile photo
-
mr.py joined the community
-
https://hasmukhindustries.com/xxxxxxxxxxxxxxxxxx.pHp7 https://cranehire.co.in/admincms/gallery/xxxxxxxxxxxxxxxxxx.pHp7 https://www.radhikaind.co.in/admincms/gallery/xxxxxxxxxxxxxxxxxx.pHp7
-
 MRX changed their profile photo
 -
 Fifityfive changed their profile photo
 -
 reza3233 changed their profile photo
 -
دیتابیس بات تلگرامی و سایت اسرائیلی Telegram bot database and Israeli site ═══════════════════════════════════════ Connect: @zirzamincybery0 data.sql data IL.sql
-
Free Flask Connect: @zirzamincybery0 ═══════════════════════════════════════ 🖥 : m02.vservers.es:8443 👤Username : ezequiel/botanic 🔑 Password:4w&R5lWfpLq?jh2z/Botanic2024*/
-
 Master_Headshot changed their profile photo
 -
target : http://www.alquds.co.uk check:https://check-host.net/check-http?host=104.22.77.109 target: alwatan.com.sa check:check-host.net/check-http?host=http://104.21.52.92 target:http://www.albayan.ae check:check-host.net/check-http?host=http://104.21.52.92 target:http://www.alriyadh.com check:check-host.net/check-http?host=2.17.4.158 target:https://al-sharq.com check:check-host.net/check-http?host=104.22.76.104 lD: MR TERMINAL تارگت ها رو دوستمون زده @Master_Terminal
-
Navigation Menu Sign in leaningtech / webvm Public Virtual Machine for the Web webvm.io License Apache-2.0 license 12.9k stars 2.4k forks Branches Tags Activity Code Issues 11 Pull requests Actions Security Insights leaningtech/webvm Name alexp-sssup alexp-sssup 4 days ago .circleci last month .github/workflows 3 months ago assets 2 months ago dockerfiles 2 years ago docs 7 months ago documents 6 months ago examples 2 years ago src last month xterm 10 months ago .gitignore 2 months ago Repository files navigation README Apache-2.0 license WebVM Discord server Issues This repository hosts the source code for https://webvm.io, a Linux virtual machine that runs in your browser. Try out the new Alpine / Xorg / i3 graphical environment: https://webvm.io/alpine.html WebVM is a server-less virtual environment running fully client-side in HTML5/WebAssembly. It's designed to be Linux ABI-compatible. It runs an unmodified Debian distribution including many native development toolchains. WebVM is powered by the CheerpX virtualization engine, and enables safe, sandboxed client-side execution of x86 binaries on any browser. CheerpX includes an x86-to-WebAssembly JIT compiler, a virtual block-based file system, and a Linux syscall emulator. Enable networking Modern browsers do not provide APIs to directly use TCP or UDP. WebVM provides networking support by integrating with Tailscale, a VPN network that supports WebSockets as a transport layer. Open the "Networking" panel from the side-bar Click "Connect to Tailscale" from the panel Log in to Tailscale (create an account if you don't have one) Click "Connect" when prompted by Tailscale If you are unfamiliar with Tailscale or would like additional information see WebVM and Tailscale. Fork, deploy, customize deploy_instructions_gif Fork the repository. Enable Github pages in settings. Click on Settings. Go to the Pages section. Select Github Actions as the source. If you are using a custom domain, ensure Enforce HTTPS is enabled. Run the workflow. Click on Actions. Accept the prompt. This is required only once to enable Actions for your fork. Click on the workflow named Deploy. Click Run workflow and then once more Run workflow in the menu. After a few seconds a new Deploy workflow will start, click on it to see details. After the workflow completes, which takes a few minutes, it will show the URL below the deploy_to_github_pages job. You can now customize dockerfiles/debian_mini to suit your needs, or make a new Dockerfile from scratch. Use the Path to Dockerfile workflow parameter to select it. Run WebVM locally with a custom Debian mini disk image Clone the WebVM Repository git clone https://github.com/leaningtech/webvm.git cd webvm Download the Debian mini Ext2 image Run the following command to download the Debian mini Ext2 image: wget "https://github.com/leaningtech/webvm/releases/download/ext2_image/debian_mini_20230519_5022088024.ext2" (You can also build your own disk image by selecting the "Upload GitHub release" workflow option) Update the configuration file Edit config_public_terminal.js to reference your local disk image: Replace: "wss://disks.webvm.io/debian_large_20230522_5044875331.ext2" With: "/disk-images/debian_mini_20230519_5022088024.ext2" (Use an absolute or relative URL pointing to the disk image location.) Replace "cloud" with the correct disk image type: "bytes" Build WebVM Run the following commands to install dependencies and build WebVM: npm install npm run build The output will be placed in the build directory. Configure Nginx Create a directory for the disk image: mkdir disk-images mv debian_mini_20230519_5022088024.ext2 disk-images/ Modify your nginx.conf file to serve the disk image. Add the following location block: location /disk-images/ { root .; autoindex on; } Start Nginx Run the following command to start Nginx: nginx -p . -c nginx.conf Nginx will automatically serve the build directory. Access WebVM Open a browser and visit: http://127.0.0.1:8081. Enjoy your local WebVM! Example customization: Python3 REPL The Deploy workflow takes into account the CMD specified in the Dockerfile. To build a REPL you can simply apply this patch and deploy. diff --git a/dockerfiles/debian_mini b/dockerfiles/debian_mini index 2878332..1f3103a 100644 --- a/dockerfiles/debian_mini +++ b/dockerfiles/debian_mini @@ -15,4 +15,4 @@ WORKDIR /home/user/ # We set env, as this gets extracted by Webvm. This is optional. ENV HOME="/home/user" TERM="xterm" USER="user" SHELL="/bin/bash" EDITOR="vim" LANG="en_US.UTF-8" LC_ALL="C" RUN echo 'root:password' | chpasswd -CMD [ "/bin/bash" ] +CMD [ "/usr/bin/python3" ] How to use Claude AI To access Claude AI, you need an API key. Follow these steps to get started: Create an account Visit Anthropic Console and sign up with your e-mail. You'll receive a sign in link to the Anthropic Console. Get your API key Once logged in, navigate to Get API keys. Purchase the amount of credits you need. After completing the purchase, you'll be able to generate the key through the API console. Log in with your API key Navigate to your WebVM and hover over the robot icon. This will show the Claude AI Integration tab. For added convenience, you can click the pin button in the top right corner to keep the tab in place. You'll see a prompt where you can insert your Claude API key. Insert your key and press enter. Start using Claude AI Once your API key is entered, you can begin interacting with Claude AI by asking questions such as: "Solve the CTF challenge at /home/user/chall1.bin. Note that the binary reads from stdin." deploy_instructions_gif Important: Your API key is private and should never be shared. We do not have access to your key, which is not only stored locally in your browser. Bugs and Issues Github link https://github.com/leaningtech/webvm
-
Hello cracker prooo
-
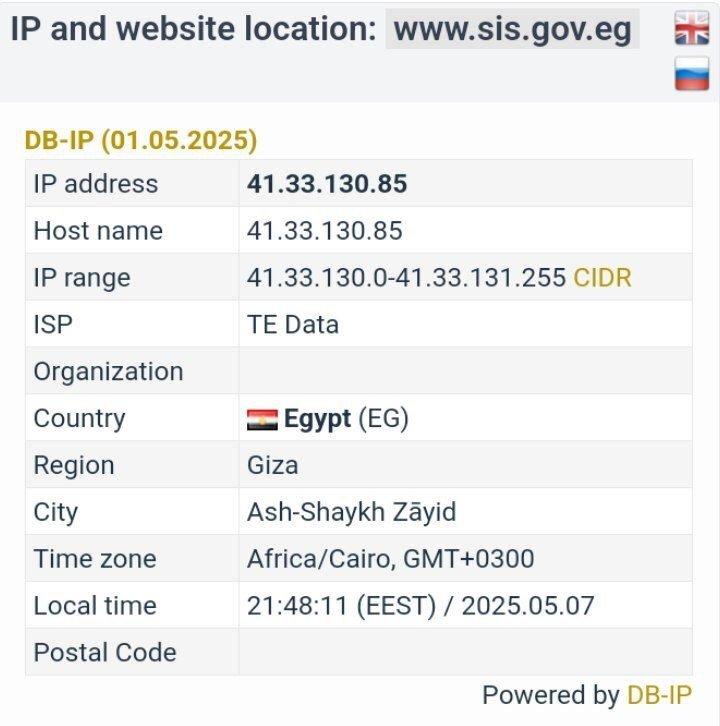
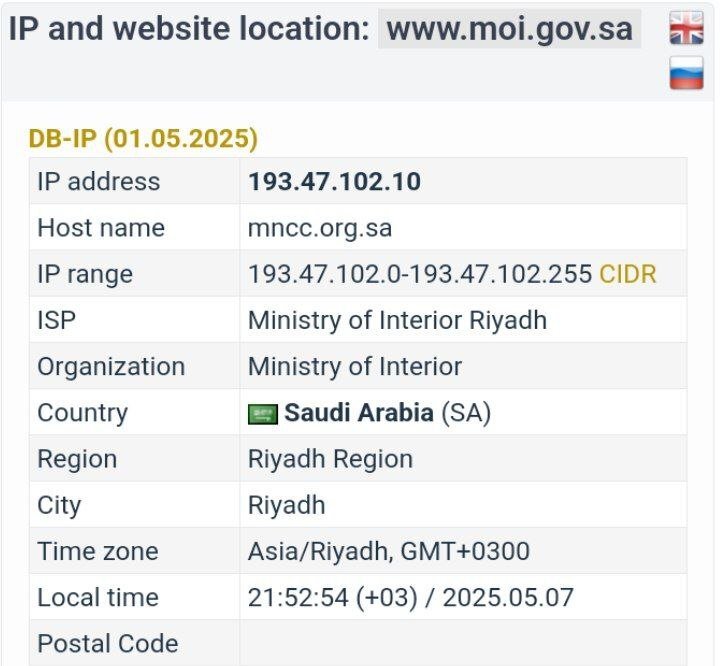
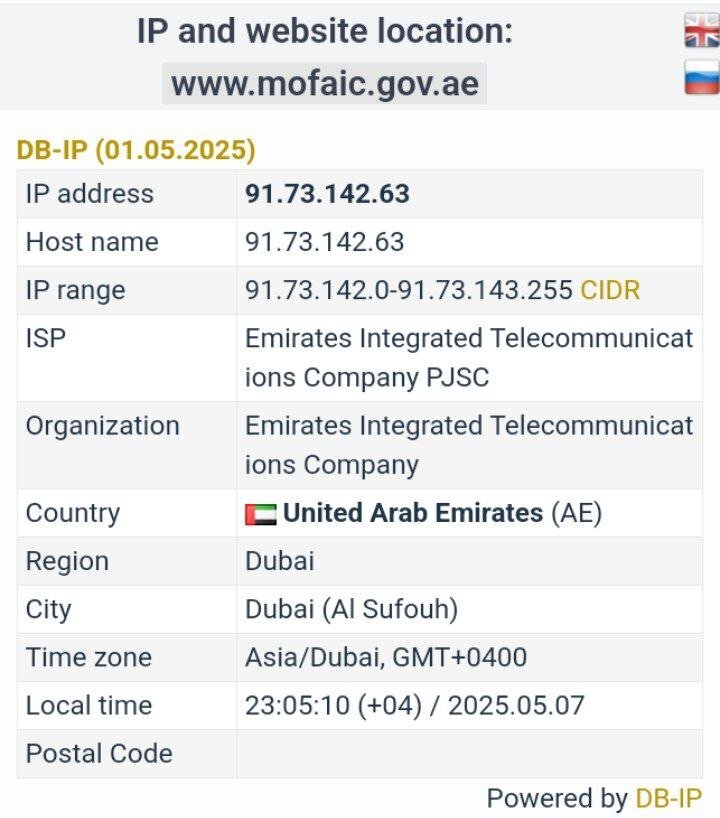
https://t.me/DARKDDOSC2 اولین تارگت دولتی و رسمی که داخل فروم زیر زمین سایبری بچه ها معرفی کردن !! target: http://www.sis.gov.eg/ Check host ping: https://check-host.net/check-report/25d3af5bk652 Check host http: https://check-host.net/check-report/25d3aff2kc تارگت دوم دولتی و رسمی داخل فروم زیر زمین سایبری!! Target: http://www.moi.gov.sa/ Check host ping: https://check-host.net/check-report/25d3b80bka38 Check host http: https://check-host.net/check-report/25d3c1a3k4a6 این فول نخورد ، سایتش واقعا قوی بود تارگت سوم باشه 🥱 Target: http://www.mofaic.gov.ae/ Check host ping: https://check-host.net/check-report/25d3cb9dk8d6 #DARK_DDOS_C2
-
بهبه وقت پخت و پز است
-
30 سایت عربی براتون آوردم 🔥 رسانههای خبری و تحلیلی 1. http://www.aljazeera.net/ 2. http://www.alarabiya.net/ 3. http://www.bbc.com/arabic 4. http://www.al-sharq.com/ 5. http://www.alriyadh.com/ 6. http://www.alwatan.com.sa/ 7. http://www.albayan.ae/ 8. http://www.alquds.co.uk/ 9. http://www.al-akhbar.com/ 10. http://english.aawsat.com/ --- سایتهای دولتی و رسمی 11. http://www.sis.gov.eg/ 12. http://www.moi.gov.sa/ 13. http://www.mofaic.gov.ae/ 14. http://portal.www.gov.qa/ 15. http://www.ministryinfo.gov.lb/ --- دانشگاهی و آموزشی 16. http://www.aucegypt.edu/ 17. http://www.ksu.edu.sa/ 18. http://www.qu.edu.qa/ 19. http://www.uaeu.ac.ae/ 20. http://www.ju.edu.jo/ --- فروشگاهها و خدمات آنلاین 21. http://saudi.souq.com/sa-en/ 22. http://www.namshi.com/ 23. http://www.jamalon.com/ 24. http://www.noon.com/ 25. http://www.mumzworld.com/ --- فرهنگی، اجتماعی، سرگرمی 26. http://www.hawaaworld.com/ 27. http://www.fatakat.com/ 28. http://www.lakii.com/ 29. http://www.kooora.com/ 30. http://www.arablit.org/
-
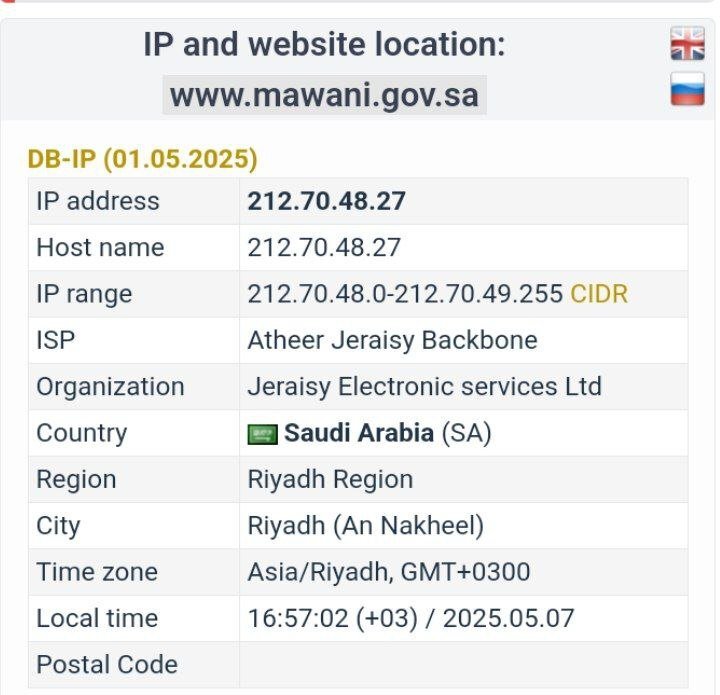
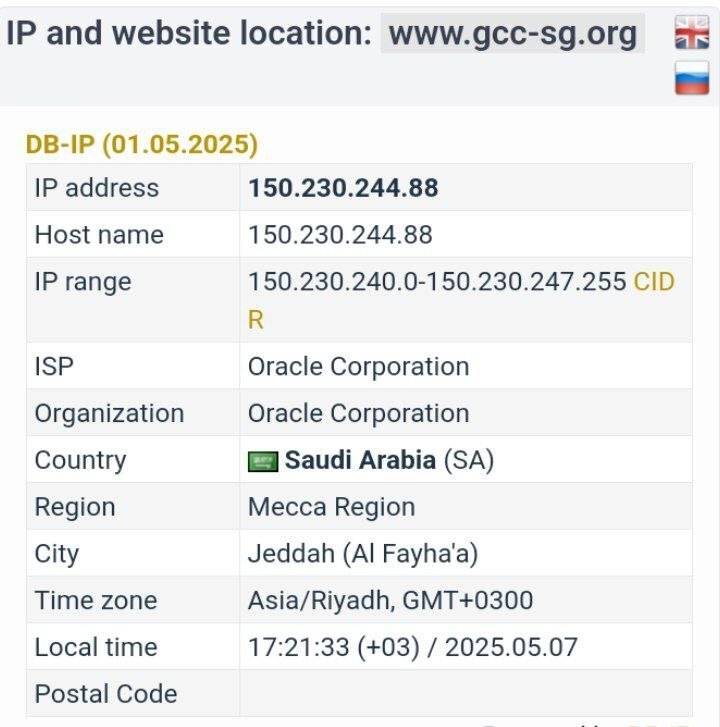
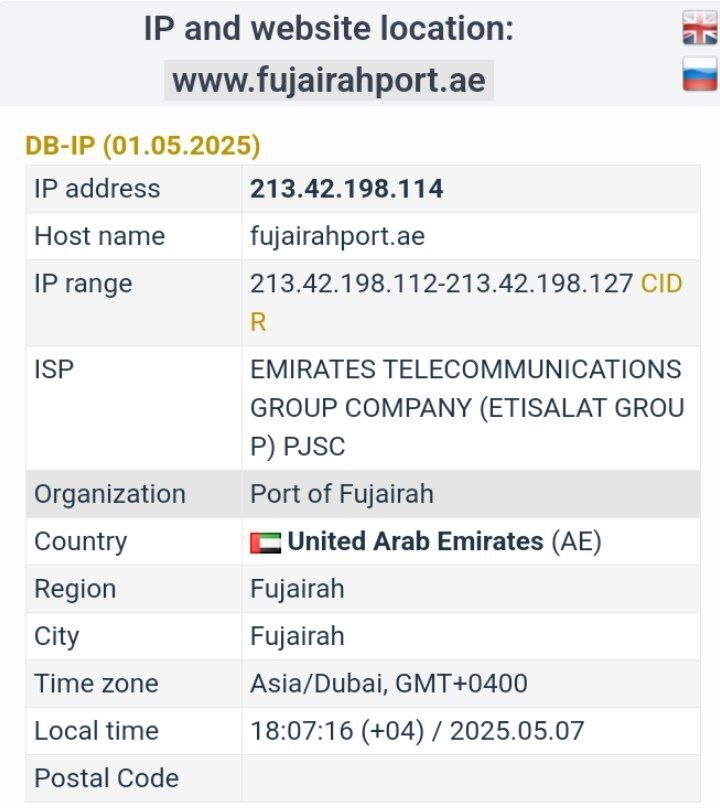
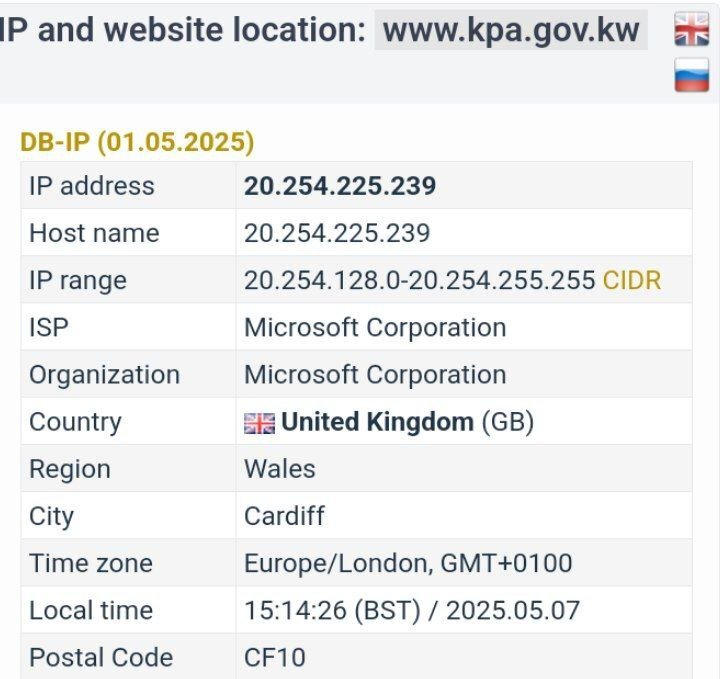
تا عرب ها دست از این حرکت ها برندارند حملات ما ادامه خواهد داشت ، از تمام تیم های دیگر درخواست داریم به ما در این حملات کمک کنند ، تمام سایت های دولتی و رسمی اعراب مورد حمله قرار خواهد گرفت target: https://www.mawani.gov.sa/ar check host ping: https://check-host.net/check-report/25d15582kc80 check host http: https://check-host.net/check-report/25d15685kddb #DARK_DDOS_C2 #حملات_همه_جانبه فقط بگین کدوم سایت عربی هست 😂 به تمام سایت های عربی حمله خواهد شد از سایت های مهم و دولتی گرفته تا سایت های معمولی ، هیچ سایت عربی رو تا امشب سالم نخواهیم گذاشت ، و این حملات تا عرب ها به گوه خوردن نیوفتن ادامه خواهد داشت target: https://www.fujairahport.ae/ar check host ping: https://check-host.net/check-report/25d16e28k5a3 check host http: https://check-host.net/check-report/25d16f39kcaf #DARK_DDOS_C2 #حمله_همه_جانبه به هیچ کدوم از سایت های عربی رحم نخواهیم کرد نمی بخشیم ، فراموش نمیکنیم!! target: https://www.kpa.gov.kw/ check host ping: https://check-host.net/check-report/25d18076kcab check host http: https://check-host.net/check-report/25d1828ckdb5 #DARK_DDOS_C2 #حمله_همه_جانبه خلیج عربی 😳 ؟؟ خفه شو 😂😂 target: https://www.gcc-sg.org/ar check host ping: https://check-host.net/check-report/25d18c92k1e7 check host http: https://check-host.net/check-report/25d19355kc58 #DARK_DDOS_C2 #حمله_همه_جانبه https://t.me/DARKDDOSC2
-
یک آسیب پذیری (؟) در Microsoft Telnet Client گزارش شده که امکان افشای داده های احرازهویت NTLM رو میده. پروتکل تلنت یک پروتکل ارتباطی قدیمی و ناامن هستش. مشکلش هم اینه که اطلاعاتی مثله پسورد رو بصورت متن ساده انتقال میده. مایکروسافت برای اینکه این پروتکل رو بهبود بده، یک افزونه بنام MS-TNAP (Microsoft Telnet Authentication Protocol) بهش اضافه کرد که بجای ارسال پسورد بصورت متن ساده، از سیستم احراز هویت ویندوز (مثل NTLM یا Kerberos) استفاده میکنه. وقتی کلاینت تلنت ویندوز به یک سرور تلنت وصل میشه و سرور از MS-TNAP پشتیبانی میکنه، کلاینت بصورت خودکار اطلاعات احراز هویت ویندوز (مثل هش NTLM) رو به سرور میفرسته. این آسیب پذیری که گزارش شده، اینجوری هستش که هکر یک سرور با پشتیبانی از MS-TNAP راه اندازی میکنه، کاربر رو فریب میده تا به این سرور وصل بشه و اینجوری هش NTLM رو بدست میاره. بعدش میتونه با ابزارهایی مثله Hashcat اونو کرک کنه یا حملات NTLM Relaying انجام بده. ویندوز برای مدیریت امنیت هنگام اتصال به سایتها، سرورها یا منابع شبکهای، مفهومی به نام Security Zones داره. این مناطق تعیین میکنن که ویندوز چطور با یک منبع (مثل سایت یا سرور) رفتار کنه، مثلاً آیا اطلاعات حساس (مثل پسورد) رو بصورت خودکار بفرسته یا هشدار بده. در ویندوز 5 منطقه داریم: - Local Intranet Zone - Trusted Sites Zone - Internet Zone - Restricted Sites Zone - Local Machine Zone البته آخری در مباحث شبکه مطرح نیست و منابع روی کامپیوتر رو شامل میشه. برای بررسی در ویندوز 10 این مسیر رو طی کنید: Windows + R > control > Network and Internet > Internet Optional > Security Tab اینجا با انتخاب هر منطقه و کلیک روی Sites آدرس های هر منطقه رو میبینید. شما وقتی با کلاینت تلنت (Telnet) مایکروسافت با افزونه ی MS-TNAP بخوایید به یک سرور در یک منطقه غیرقابل اعتماد مانند Internet zone وصل بشید، هشدار زیر میگیرید: "You are about to send your password information to a remote computer in Internet zone. This might not be safe. Do you want to send anyway (y/n)": اگه بله رو بزنید و سرور مخرب باشه، اطلاعات حساس ارسال میشن. اگه سرور مخرب در منطقه مورد اعتماد (مانند Intranet zone یا Trusted Sites) باشه یا سیاست منطقه ای در سیستم خاموش باشه بازم بصورت خودکار ارسال میشه. قسمت بدش اینجاست که اگه ادمین بدون در نظر گرفتن پروتکل میزبانهارو در مناطق قابل امن ثبت کنه. یعنی بجای http://192.168.1.1 از 192.168.1.1 استفاده کنه. اینجوری همه ی پروتکل های 192.168.1.1 امن حساب میشن یکیش همین تلنت. چون ویندوز براساس پروتکل و میزبان یعنی telnet://192.168.1.1 مورد اعتماد بودن هاست رو بررسی میکنه. این آسیب پذیری توسط Hacker House گزارش شده و یک PoC هم براش منتشر کردن. نسخه های تحت تاثیر در صورتیکه تلنت روشون فعال باشه: Windows NT 4.0 Windows 2000 Windows XP Windows Server 2003 Windows Server 2003 R2 Windows Vista Windows Server 2008 Windows Server 2008 R2 Windows 7 Windows Server 2012 Windows Server 2012 R2 Windows 8 Windows 8.1 Windows 10 Windows Server 2016 Windows Server 2019 Windows Server 2022 Windows 11 Windows Server 2025 اگه از ویندوز 10 استفاده میکنید، اگه وارد مسیر زیر بشید: Windows+R > optionalfeatures در پنجره ی Windows Features دنبال Telnet Client باشید، میبینید که بصورت پیش فرض فعال نیست. بنابراین بصورت پیش فرض تحت تاثیر آسیب پذیری نیستید مگه اینکه این فعال کنید. نکته ای که وجود داره قربانی باید به یک سرور مخرب وصل بشه، بنابراین در سیستم هایی که تلنت روشون فعاله روی لینکهای ://telent هم کلیک نکنید. در سیستمهای قدیمی مثله XP هم که روش زیاده و نیازی به این آسیب پذیری نیست. مایکروسافت فعلا تایید یا تکذیبی نداده.
-
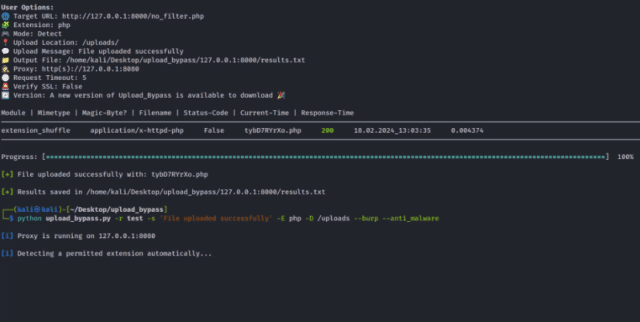
 Upload_Bypass is a command-line tool that automates discovering and exploiting weak file upload filters. If you’re tired of manually renaming extensions and tweaking payloads by hand, this tool does the dirty work. File upload restrictions are one of the last lines of defence in many web apps and one of the most misunderstood. Some developers rely on MIME type checks. Others try to validate file extensions. A few go the extra mile with content inspection. But as any decent pentester knows, there’s almost always a way in. What Is Upload_Bypass? Upload_Bypass is a Python-based tool built by sAjibuu that helps bypass file upload protections commonly seen in CTFs, bug bounty targets, and poorly configured web apps. Instead of endlessly trying variations like shell.php, shell.php5, or shell.jpg.php, you can throw your file at Upload_Bypass and let it rip through automated filter evasion techniques, including: Filename and extension variations MIME type spoofing Header manipulation Extension appending (.jpg;.php) Uploading polyglot files (e.g. image + PHP) Why This Matters Improper file upload validation is one of the most common paths to remote code execution (RCE). Once you can smuggle a malicious file onto a server, you’ve got the ability to: Drop webshells Execute arbitrary code Establish persistence Escalate privilege (depending on misconfig) It’s one of the highest-ROI vulnerabilities in both offensive security and bug bounty hunting. Features Automatically tests multiple upload bypass payloads Supports common web extensions (.php, .asp, .jsp, .html) Smart payload renaming and MIME spoofing Verbose output to show what worked and what didn’t Designed for CTF players, bug bounty hunters, and red teamers Clean and hackable Python source Installation Simple setup on any system with Python 3: git clone https://github.com/sAjibuu/Upload_Bypass.git cd Upload_Bypass pip install -r requirements.txt python3 Upload_Bypass.py Example Usage Upload_Bypass is interactive. You’ll be prompted to: Select the file you want to upload Choose the output folder Pick target extension (e.g. .php) Specify the platform (web, mobile, ctf, etc.) Usage options: Usage: Upload Bypass [OPTIONS] Options: -h, --help Print help (see more with '--help') -U, --usage Print the how to save the request file instructions. -v, --version Print version Required Arguments: -r, --request_file <REQUEST_FILE> Provide a request file to be proccessed -E, --extension <EXTENSION> Forbidden extension to check (ex: php) -A, --allowed <EXTENSION> Allowed extension (ex: jpeg) - Optional - if not set the program will auto-detect the extension Choose only one from the options below: -s, --success <MESSAGE> Provide a success message when a file is uploaded (ex: File was uploaded successfully) -f, --failure <MESSAGE> Provide a failure message when a file is uploaded (ex: File is not allowed!) -S, --status_code <STATUS_CODE> Provide a status code for a success upload (ex: 200) Mode Settings: -d, --detect Upload harmless sample files (Suitable for a real penetration test) -e, --exploit Upload Web-Shells files when testing -a, --anti_malware Upload Anti-Malware Test file (Eicar) when testing I. If set with -E flag the program will test with the Eicar string along with the choosen extension II. If set without the -E flag the program will test with Eicar string and a com extension Modules Settings: -l, --list List all modules -i, --include_only <MODULES> Include only modules to test from (ex: extension_shuffle, double_extension) -x, --exclude <MODULES> Exclude modules (ex: svg_xxe, svg_xss) Request Settings: --base64 Encode the file data with Base64 algorithm --allow_redirects Follow redirects -P, --put Use the HTTP PUT method for the requests (Default is POST) -Pa, --patch Use the HTTP Patch method for the requests (Default is POST) -R, --response Print the response to the screen -c, --continue Continue testing all files, even if a few uploads encountered success -t, --time_out <NUM> Set the request timeout (Default is 8) -rl, --rate_limit <NUMBER> Set a rate-limit with a delay in milliseconds between each request Proxy Settings: -p, --proxy <PROXY> Proxy to use for requests (ex: http(s)://host:port, socks5(h)://host:port) -k, --insecure Do not verify SSL certificates --burp_http Set --proxy to 127.0.0.1:8080 and set --insecure to true (For HTTP requests) --burp_https Set --proxy to 127.0.0.1:8080 and set --insecure to false (For HTTPs requests) Optional Settings: -D, --upload_dir <UPLOAD_DIR> Provide a remote path where the Web-Shell should be uploaded (ex: /uploads) -o, --output <OUTPUT_PATH> Output file to write the results into - Default current directory (ex: ~/Desktop/results.txt) --debug <NUM> Debug mode - Print the stack trace error to the screen and save it to a file (ex: --debug 1) I. Level 1 - Saves only the stack trace error (default). II. Level 2 - Saves the stack trace error and user's arguments along with the request file. Resume settings: --resume <STATE_FILE> State file from which to resume a partially complete scan Update settings: -u, --update Update the program to the latest version The tool then generates a directory of modified versions of your original payload, each crafted to evade upload filters using different strategies. Test them manually or script uploads using Burp or cURL to see what slips past. Final Thoughts Upload_Bypass doesn’t promise magic—it doesn’t brute force login portals or drop zero-days. But it does exactly what it says: it it helps you bypass upload restrictions between you and shell access. If you’re tired of trying every bypass method manually, let Upload_Bypass do it for you—with better consistency and less risk of human error. Drop in your payload, choose your options, and go find the filter that fails. You can download Upload_Bypass or read more here: https://github.com/sAjibuu/Upload_Bypass
-
- 1
-

-
TELEGRAM @zirzamincybery0 SQLMap: SQLMap is an open-source tool that automates the process of detecting and exploiting SQL Injection vulnerabilities in web applications. It supports a wide range of databases and provides extensive options for both identification and exploitation. SQLNinja: SQLNinja is a tool specifically designed to exploit SQL Injection vulnerabilities in web applications that use Microsoft SQL Server as the backend database. It automates various stages of exploitation, including database fingerprinting and data extraction. JSQL Injection: A Java library focused on detecting SQL injection vulnerabilities within Java applications. It supports various types of SQL Injection attacks and provides a range of options for extracting data and taking control of the database. BBQSQL: BBQSQL is a Blind SQL Injection exploitation framework designed to be simple and highly effective for automated exploitation of Blind SQL Injection vulnerabilities.
-
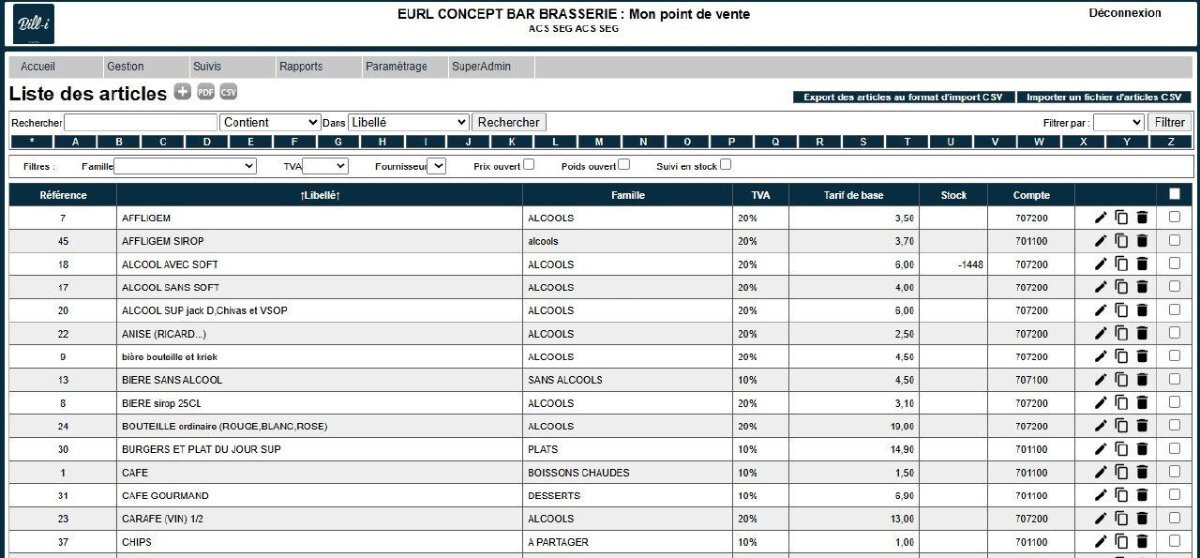
نفوذ هکری به سامانه فروش فرانسوی؛ دادههای صدها شرکت در معرض خطر یک گروه هکری با انتشار پیامی در کانال های خود مدعی شد به سامانه داخلی «Bill-i.fr» - نرمافزار فرانسوی مدیریت فروش و فاکتورسازی توسعهیافته توسط شرکت «TECHFIVE» - نفوذ کرده است. بر اساس این گزارش، مهاجمان به اطلاعات صدها شرکت و کسبوکار فرانسوی که از این سامانه استفاده میکنند دسترسی یافتهاند. این گروه با تأکید بر در اختیار داشتن دادههای حساس مشتریان، اعلام کرد بهزودی بخشی از این اطلاعات را منتشر خواهد کرد.
-
 Noir changed their profile photo
 -
Chapter One: The guide is has different parts to explain how to use up to 15 VPN connection to be safe and protect yourself against the NSA and other agencies that want to see what are you doing,Ok Now let's start. First of all lets start with what you will need to achive multi layer of security( VPN), 1.You need VPN providers,The next are a few VPN providers that you can use.(Private Internet Access,TORGUARD,NordVPN,AIRVPN,Mullvad,BolehVPN,IPVANISH,VikingVPN,PrivateVPN,Ipredator,BlackVPN) If you another VPN check to see what type of encryption are ussing and if THEY KEEP LOOGS. 2.You will need 2 or more VPN providers for using multiple VPN connection on the same PC,PS: You can use 2 multiple connection from the same VPN providers if you chose so. 3.After you chose what VPN you want to use,You will need the next software "Viscosity" you can find the software here https://www.sparklabs.com/viscosity/ , Viscosity is a OpenVPN client that will work in the same time with other OpenVPN clients that you are using from the VPN providers(The software that you need to install when you purchase a VPN,Majority of VPN providers has his own software,or they choose a commercial OpenVPN client ) 3.1. Viscosity is only 9$ unfortunately you can buy only using your paypal account or your card. 3.2. Viscosity is working only on MAC and Windows 4.After you purchase the Viscosity now we are ready to go,First of all you need to start the VPN that you selected to be your first layer,After you opened the software and you are connected to one of the VPN servers. 4.1.After that go to your second VPN that you want to use ( go to the VPN website and search to see where you can find to download the individual .opvn files ( OPVN files are the the VPN gate that you are using to connect to a specific VPN server )). 4.2.Now go to search in START and write "tap" and open with admin rights "Add a new TAP virtual ethernet adapter" ( to open with admin rights you need to click right and click on " Run as Administrator"/ 4.3. After you downloaded the file and saved the file go to Viscosity and down on the right is a box click on the box and select Import Connection-From File and select the .opvn file that you want to connect. 4.4. Now you are ready to connect to the second VPN provider and you your trafic will go trough two different VPN connection 5.Now after you finish with the second VPN provider you can add to the Viscosity a new server ( i recommend to use a different server from the second VPN provider because if you use a different VPN provider for the third connection the network will be a little slow ) Now I will write a little scheme to see how the connections must be VPN1 --> VPN2(viscosity connection,can be a different vpn provider or a different server from the first VPN ) ---> VPN3 (viscosity connection,can be a different vpn provider or a different server from (the first or the second VPN provider) With the first chapter you will manage to connect trough 3-4 VPN's , For the first chapter you don't need any router only a PC that is running Windows 7/8 CHAPTER 2: Now let's see part two,We need a few routers ( If you want to run more than 4 VPN on your PC you need routers,How many? Well for example if you want to run 10 VPN you need 6 routers ) Not all types of routers are working,YOu need routers compatible with Tomato or DD-wrt ( DD-WRT and Tomato are linux firmware for wireless routers ) HEre you can read more about DD-WRT and Tomato www.dd-wrt.com http://www.polarcloud.com/tomato To see if your router or to know what routers to buy you can see here http://www.dd-wrt.com/wiki/index.php/Supported_Devices http://en.wikibooks.org/wiki/Tomato_Firmware/Supported_Devices The best routers compatible with DD-WRT and Tomato,Personal i recommend RT-N66U Tomato: Asus RT-N66U,Asus RT-AC66U Wirless-AC1750,Linksys E4200,Asus RT-N16 DD-WRT: Netgear Nighthawk R7000,Asus RT-AC66U,Netgear AC1450,Netgear WNDR3700,Cisco Linksys E1200 Now after you bought your router ( or maybe you already have the router's) Let's proceed, Now you need to install dd-wrt or tomato on the router,You need to replace the router firmware with dd-wrt or tomato,To do so you will find the details on the forums of each firmware DD-WRT http://www.dd-wrt.com/phpBB2/ Tomato http://www.linksysinfo.org/index.php?forums/tomato-firmware.33/ IF YOU DON'T FIND THE INFORMATION ON THE FORUM ABOUT HOW TO INSTAL THE FIRMWARE PLEASE CONTACT ME TO SHOW YOU HOW. Now after you instaled the firmware on each router now you are already to go,What you need to do ? CHAPTER 3: Now you need to make connect the routers Here is how to do: To be more easy i used some examples 1. Decide which router will be MAIN router. Other router - The SECOND / THIRD /FORTH ... (if any) - will be assigned as a SLAVE or SECOND. 2. Make sure that your MAIN router is set up to provide internet connection. Simply connect your computer directly to the MAIN router and attempt to access any website. 3. Determine MAIN router's LAN IP address. Here is the list of commonly used: Cisco router default IP address is 192.168.1.1 T-Link router default IP address is 192.168.0.1 Netgear router default IP address is 192.168.2.1 Rogers SMC router default IP address is 192.168.0.1 Apple Airport Extreme default IP address is 192.168.1.1 Belkin router default IP address is 192.168.2.1 Netgear router defaul IP address is 192.168.0.1 Perform the following steps in order to establish MAIN router's IP address: a. Connect your computer to MAIN router. b. Start Command Prompt (it can be found under Start ->> All programs ->> Accessories ->> Command Prompt), type IPCONFIG and press ENTER. c. Result of this command will be your local IP address, Subnet mask and Default Gateway. d. Default Gateway is your router IP address. Write it down or remember it, you will need it for next steps. 4. Disconnect your computer from MAIN router. 5. Reset SECOND router to manufacture state by pressing Reset button. a. Power on your SECOND router. b. Wait a minute. c. Locate a small hole on the body of SECOND router and using a paper clip press Reset button and hold it for about 25 seconds, release it. d. Wait a minute and continue to next step. 6. Cover WAN/Internet port of the SECOND router with a masking tape. There is no need to use WAN port on SECOND router. Do not cover WAN port on the MAIN router - it is a way to have internet working. 7. Connect your computer to any LAN port of the SECOND router and determine LAN IP address of this SECOND router: a. Start Command Prompt. b. Type IPCONFIG and press ENTER. You'll get your current IP address, Subnet mask and Default Gateway. Default Gateway's IP address is SECOND router's current IP address. 8. Start any Internet Browser such as Internet Explorer, Google Chrome, Mozilla Firefox, Safari, Opera, etc. 9. In address bar (not in search bar) type IP address of the SECOND router, such as http://192.168.XXX.1 10. Type login name and password to access Web Based Interface of the SECOND router. 11. Find SECOND router's LAN or Local Area Network settings. It should be the same as you have just typed , such as 192.168.XXX.1 12. Now you will need to change this address to a different one in order to make it compatible and working together with MAIN router. This new SECOND router's LAN IP address should be very similar to MAIN router's IP address. Only keep the last number different. Example 1: MAIN Router LAN IP is 192.168.1.1 - do not change SECOND Router Original LAN IP is 192.168.2.1 - needs to be changed to 192.168.1.2 or 192.168.1.3 etc. Example 2: MAIN Router LAN IP is 192.168.0.1 - do not change SECOND Router Original LAN IP is 192.168.0.1 - needs to be changed to 192.168.0.2 or 192.168.0.3 etc. Example 3: MAIN Router LAN IP is 192.168.2.1 - do not change SECOND Router Original LAN IP is 192.168.0.1 - needs to be changed to 192.168.2.2 or 192.168.2.3 etc. After changing SECOND Router's LAN IP address do not forget to APPLY or SAVE these changes. 13. Next step is to get new IP address on the computer. You can just restart computer or disconnect and reconnect network cable from SECOND router or go to Command Prompt and type: ipconfig /release press ENTER (use a space just between ipconfig and / ) ipconfig /renew press ENTER (use a space just between ipconfig and / ) Default Gateway IP address should be the new one that was just changed. Write it down or remember. 14. Login to the SECOND router using browser with new IP address. If SECOND router is not a wireless router - skip this step. If SECOND router is the wireless router, but you are not planning to use it Wireless ACCESS POINT - disable Wireless. If SECOND router is the wireless router and you want to use it Wireless ACCESS POINT - setup name of your wireless network (SSID). SSID should be different from SSID on MAIN router. Do not forget to protect your wireless network - set up type of encryption and password. APPLY or SAVE settings. 15. Go back to LAN settings on SECOND router, find DHCP server setting and disable DHCP. SAVE or APPLY settings, close browser. We are almost done. 16. Power off MAIN and SECOND routers. 17. Connect any LAN port of the SECOND router (WAN PORT is covered by masking tape) to any LAN port of the MAIN router. 18. Power on both routers. Wait for 1-2 minutes. Now you can connect computer to any available LAN ports of the MAIN and SECOND routers, you can use both WiFi wireless networks. It should work on both routers. 19. If you have THIRD / FOURTH / FIFTH... router repeat all steps again starting from step 5 and replacing word SECOND router with THIRD / FORTH / FIFTH....router. Now after we connected the routers we need to enter the VPN details on each router, Here is a video with instructions how to instal DD-WRT https://www.youtube.com/watch?v=uQNYIaj4ins ( the video is not made by me but it's the same instruction for all DD-WRT routers , The video is from StrongVPN which is one of the good VPN ) HERE are the instruction how to instal Tomato https://www.youtube.com/watch?v=ca0zEjtp7Xg ( the video is not made by me , Is made by the guys at vpnReactor which i recommend to use as a free VPN not a premium ) Now after we installed the Tomato or DD-wrt we are ready to go.IF YOU HAVE ANY QUESTION DON'T HESITATE TO CONTACT ME ANYTIME. Chapter Two : How To use socks , For socks provider i will recommend vip72.com/vip72.org / IF you want a shared vip72.com account send me a message ( if you bought the guide - i will offer the account for free ) All my shared accounts you can buy 10 socks for 3$ How to use Socks First we need to know what SOCKS are,SOCKS is an internet protocol that routers packets between a client and a server. Now we need to chose a software to use the socks,Here is a list of software for your OS: Proxifier,FreeCap,Proxycap for Windows Redsocks,Dante for Linux Proxycap for Mac For windows i recommend to use Proxifier,For linux i recommend to use redsocks and for Mac Proxycap. Now we need to know where we buy the socks,You can buy the socks from many places but not of them are trustworthy before you buy a socks you need to know a few things, I don't recommend to buy from private vendors on darknet markets,forums ( with a few exceptions like old and respected members of darknet or a forum. Another place to buy socks and where i recommend to buy are the companies that are selling socks, here are a few examples: vip72.com,hidemyass,ironsocket If you chose to buy from a different provider you need to see if that provider has a log policy,if the provider are keeping log I strongly recommend not to buy. Now that we selected what software and socks provider will we run it's time to run the socks,For every software that i presented up you can find on their website a documentation how to use the software and run the socks.( If you don't find anything and you have any question you can send me a message anytime.) After we are up and running the socks we need to check to see if the socks that we are using is not blacklisted,If the socks is blacklisted many websites will block or will flagg you because they think you are a spammer,spider,bot.etc , To check to see if the socks is not blacklisted you can check on different websites here is a list where you can check: http://www.whatismyip.com/ http://www.whatsmyip.org/ http://mxtoolbox.com/WhatIsMyIP/ Well now we will ask if using a simple SOCKS is enough to be secure the answer to that question is NO,You won't be total secure if you are using one socks,You can runing many socks in the same time like a fence after a fence,Also i recommend before you using a socks to use a VPN or like socks you can use many VPN for layer( you can find my guide in my listing ) If you are using 2-3 VPN and 3-4 socks now you will be a lot more secure and safe,but with security will come a price your internet speed will be low.
-
😎💛اگه دوست داشتین دونیت یادتون-.- نره TRX:TVuHRHaZrBbpF6vfD39gwDXBXDsVKn2sgd new.txt
-
🎯 ابزار کنترل کامل تسک منیجر ابتدا فایل را روی سرور خود بارگذاری کنید. ⛔️ حتماً فایل را به صورت *Run as Administrator* اجرا کنید! ✅ سپس گزینهی مورد نظر خود را انتخاب کنید. 🎯 Complete Task Manager Control Tool Firstly, upload the file to your server. ⛔️ Make sure to run the file as *Administrator*! ✅ After that, select your desired option. #Dont_MissUs⚫ | @TeloRdp TeloTskMgr (2).exe
- 1 reply
-
- 1
-
-
آموزش ساخت یوزر مخفی 🪞 Tutorial on creating a hidden user🪞 ابزار رو از چنل دانلود کنید روی سرور قرار بدید💉 Download the tool from the channel and place it on the server.💉 حتما برنامه رو run as administrator بکنید ✅ Be sure to run the program as administrator.✅ بخش بالایی یوزر جدید رو بزنید و قسمت پایین پسورد رو 🥷 Enter the new user at the top and the password at the bottom.🥷 حتما توی رمزتون از حروف بزرگ و یک حروف خاص مانند @ استفاده کنید🦋 Be sure to use capital letters and a special character like @ in your password.🦋 برای اینکه اطمینان داشته بشید که یوزر ساخته شده باید پیام شما شامل این متن زیر باشد Commend run successful🌊 To ensure that the user was created, your message should include the following text: Commend run successful🌊 در غیر این صورت بود یوزر ساخته نشده❄️ Otherwise, the user would not have been created.❄️ @rdp_cracker hide user.rar
-
 MONSTER changed their profile photo
 -
یه ابزار باحال دادیم بیرون! چی کار میکنه؟ • پسوردای تکراری تو لیستتو حذف میکنه • آیپیهایی که دوبار اسکن شدن رو میریزه دور به چه درد میخوره؟ • پسورد لیستت سبک میشه، سریعتر لود میشه، اعصابتم راحتتره • آیپی تکراری نمیگیری که گودِ الکی بزنه ⸻ We dropped a chill new tool! What it does: • Cleans up duplicate passwords from your lists • Kicks out scanned IPs that showed up twice Why it’s dope: • Lighter password lists = faster hits, less mess • No more duplicate “good” IPs wasting your grind لینک ابزار ⬅️⬅️ @TeloRdp | #Dont_MissUs🏴☠️
-
آسیب پذیری بحرانی RCE در ماژول SSH در Erlang/OTP آسیب پذیری با شناسه ی CVE-2025-32433 و شدت بحرانی و امتیاز 10 در ماژول SSH در Erlang/OTP کشف و اصلاح شده که امکان اجرای کد رو به مهاجم احراز هویت نشده، میده. نسخه های OTP-27.3.3 و OTP-26.2.5.11 و OTP-25.3.2.20 نسخه های اصلاح شده هستن و نسخه های قبل از اینا، تحت تاثیر این آسیب پذیری هستن. زبان Erlang یک زبان برنامهنویسی هستش که برای ساخت سیستمهای مقیاسپذیر، مقاوم و با عملکرد بالا طراحی شده. بیشتر در سیستمهای مخابراتی، پیامرسان، تجهیزات شبکه، اینترنت اشیاء، تجهیزات ICS و OT و ابری استفاده میشه. فریمورک OTP مجموعهای از کتابخانه های استاندارد هستش که همراه Erlang ارائه میشه و ابزارهایی برای مدیریت فرآیندها، ارتباطات شبکه و ... رو فراهم میکنه. در حالت عادی، سرورهای SSH با نرمافزارهایی مثل OpenSSH پیادهسازی میشن. اما برخی سیستمها از کتابخانه ی Erlang/OTP برای پیادهسازی سرور SSH خودشون استفاده میکنن. آسیبپذیری CVE-2025-32433 در پیادهسازی پروتکل SSH که در خود کتابخانهی Erlang/OTP ارائه شده وجود داره یعنی Erlang/OTP یک ماژول داخلی به نام :ssh داره که برای پیادهسازی سرورها و کلاینتهای SSH استفاده میشه. این ماژول بخشی از فریمورک OTP هستش و به توسعهدهندگان اجازه میده سرور یا کلاینت SSH بسازن. اگه محصول یا توسعه دهنده ای از این ماژول استفاده کنه، تحت تاثیر این آسیب پذیری قرار داره. اگه سرویس SSH با امتیاز root اجرا بشه، مهاجم دسترسی root داره. داده های خام در شودان، نشون میده که 685,966 سرور در حال اجرای Erlang/OTP هستن که سهم ایران 881 مورد هستش. نکته جالب اینکه گویا اکسپلویت این آسیب پذیری هم ساده هستش و افرادی تونستن با AI، توسعه بدن. Horizon3 Attack Team یک دمو اینجا منتشر کردن و platformsecurity هم یک بلاگ و PoC منتشر کرده.
-
سلام به همه رفتا امیدوارم حالتون خوب باشه و خیلی خوش اومدید به فروم زیر زمین سایبری. در این پست میخوایم به شما یک اکسپلویت قدیمی ولی خفن رو معرفی کنیم بزنید بریم سراغ اموزش. اینم بگم که این اکسپلویت پرایوت نیست و پابلیک هست [+] dork : ~> inurl:/index.php/frontend/login/en site: [+] Tested targets : ~> https://jualbelihartanah.com.my/files/hacked.txt https://nammamane.net.in/files/hacked.txt http://place.thailand.gen.in/files/hacked (2).txt خب برای اینکه بتونیم فایل اپلود کنیم روی سایت به این روش هست خب برای اینکه بتونید در این مسیر بیاید در ادامه اون سایت این مسیر را وارد کنید index.php/frontend/login/en خب بعد از اینکه این وارد شدید روی ساخت حساب بزنید یا همون create بزنید و یک حساب بسازید خب بعد وارد این صفحه میشوید که باید اطلاعات خود را وارد کنید مثل ایمیل نام کاربری و .... میتونید برای ایمیل از ایمیل های فیک استفاده بکنید مثل temp mail و بقیه اطلاعات هم میتوانید فیک وارد کنید و بعد ساخت ایمیل لاگین بکنید در سایت همون قسمتی که گفتم باید حساب بسازید یا اگر پیدانکردید در ادامه سایت این مسیر را وارد کنید index.php/frontend/login/en و بعد نام کاربری و رمز را وارد کنید و وارد بشید و بعد وارد میشید در این قسمت خب برای اینکه بتونیم فایل اپلود بکنیم وارد قسمت my profile شوید که در تب بالا هست خب شما وارد این صفحه میشید که اگر بیاید پایین این اپلودر هارو میبینید خب شما در اون قسمت سبز رنگ که نوشته add files رو میزنید و یک فایل انتخاب میکنید و بعدش خودکار سیو میشه که فقط پسوند های txt رو قبول میکنه و بعد که اپلود شد فایل میاید به این سایت https://target.com/files/اسم فایل .txt و بعدش شما به این مسیر میاید خب الان شما این سایت رو به اصطلاح دیفیس کردید و سعی کنید شل اپلود کنید و خب دوستان اینم از این اموزش بود اگر حمایت بشم cve poc میزارم عشق کنید و این یه اکسپلویت ساده بود امیدوارم خوشتون بیاد دوستدار شما ~AGAND842~
-
- 1
-
-
139.167.150.166:7276@SGTPL\account;user@123 14.194.36.30:4578@RVHOME\user1;Kumar@123 122.170.104.254:7723@DELLSERVER\user;user@123 124.123.41.33:1981@WIN-58AF199QESQ\Admin;Welcome123 103.236.152.208:21221@SERVER\user2;123 122.176.96.125:8191@TALLYSERVER\pc;1 122.166.68.89:61901@AMWILLHEALTHCAR\user1;123 116.74.77.54:2022@SERVER\user1;1234 103.88.83.29:45451@CABIN-PC\user2;123 103.97.197.173:443@WIN-NNOO67HG0VB\user2;user@123 103.81.119.197:33203@WST\account;123 103.254.35.110:8855@SERVER\user1;123456 103.238.110.163:21314@SAVANISRV\user2;123 103.252.6.101:4568@SERVER\user1;user@1 103.230.153.3:60535@IT\account;123


.png.dea0e9d185a25148da7bcabeef91d620.png)
.png.3f7b7bd53e6ee5b30754683da42173c7.png)
.png.91abafd4df261e5e7f9927010a1c23e4.png)
.png.5c6f123d71803b04cf65de19c63c0d52.png)
.png.c9511c17d3b5d514789505820843f488.png)
